Animal Hospital Sanity Tracker — Know Your Number Before It's Zero
Sanity is the resource that actually decides your run, and guessing it is how shifts end early. Tap what just happened — every button carries the game's verified values — and keep the real number in front of you.
Animal Hospital Sanity Tracker
Tap what just happened — keep a running count of your actual sanity instead of eyeballing the bar. Starts at the default 61%.
At 0% you're dead — only a teammate holding a $1,000 Teddy Bear can bring you back; it never works on yourself. Bed Monster keeps draining −5 per 2s while you're still on the red floor; fire and candles range −1 to −3/s depending on distance — this tracker uses the mid-range value per tap. Exact ranges and edge cases on the main wiki's beginner guide.
How to read the Animal Hospital sanity tracker
The game shows you a bar. A bar is fine at 80% and useless at 25%, which is exactly when the number starts to matter. The tracker keeps the figure itself: start at 61%, tap each event as it happens, and the running total is what you'd actually have left.
- The colour is a margin, not a state.Above 45% the number reads in the accent colour, 45% and below turns amber, 20% and below turns red. Those bands are the tracker's own warning levels — the game does not label them — but they map to something real: below 20% you no longer have room for a single −20 jumpscare.
- Per-second drains are one tap per second.Ghost proximity, fire and the Bed Monster bleed you continuously. Tap once per second of exposure, or tap once and read it as “this is what one second costs me”.
- Ranged values use the middle. Candles and fire are documented as −1 to −3 depending on distance; the tracker charges the mid-range −2 per tap. Treat those two as approximations and everything else as exact.
- Reset between shifts. The default is 61% — a class with a sanity bonus starts higher, so adjust by tapping a coffee or two before the shift begins.
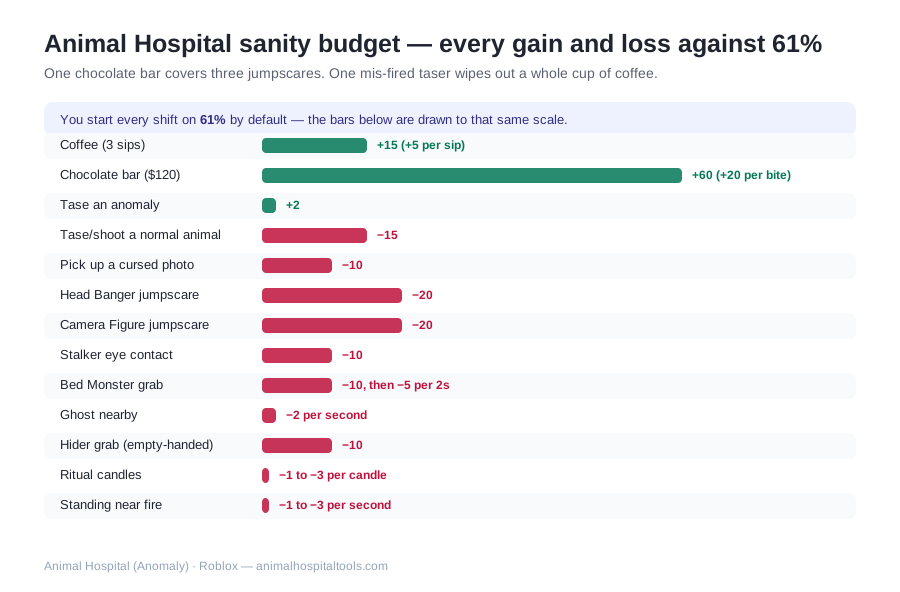
Every value the Animal Hospital sanity tracker uses
These are all the documented sources of sanity change, gains first. The notes column is the part worth memorising — most of these losses are avoidable by procedure rather than by skill.
| Action / event | Sanity | Notes |
|---|---|---|
| Coffee (3 sips) | +15 (+5 per sip) | Machine brews one cup per 180s; can't be handed to teammates once taken |
| Chocolate bar ($120) | +60 (+20 per bite) | Best sanity-per-dollar in the shop |
| Tase an anomaly | +2 | Confirm it's an anomaly first |
| Tase/shoot a normal animal | −15 | The reason you double-check |
| Pick up a cursed photo | −10 | Let photos finish printing, look, then grab |
| Head Banger jumpscare | −20 | Happens if you shoo it without coffee |
| Camera Figure jumpscare | −20 | Zooming in on a broken feed |
| Stalker eye contact | −10 | Look at its legs, not its face |
| Bed Monster grab | −10, then −5 per 2s | Stay off the red floor |
| Ghost nearby | −2 per second | Spray with extinguisher to reveal |
| Hider grab (empty-handed) | −10 | It steals held items instead |
| Ritual candles | −1 to −3 per candle | Eyedrops/IV/coffee snuff them without loss |
| Standing near fire | −1 to −3 per second | Grab the extinguisher |
Two numbers do most of the arithmetic in a run: a chocolate bar is +60 for $120 — the best sanity-per-dollar in the shop — and tasing a normal animal is −15, which undoes an entire cup of coffee. That's the case for checking a patient properly with the anomaly identifier before you reach for the taser.
What each monster costs you, and how to stop paying it
Most of a bad shift's sanity loss comes from monsters, not from misjudged patients — and almost every one of them has a counter that costs nothing. The Head Banger is the clearest example: shoo it away and it's a −20 jumpscare, hand it a coffee (after two sips of your own) and you come out +10 ahead.
| Monster | What it costs | Counter |
|---|---|---|
| Shapeshifter | −6 per 0.5s while attacking | 2 gun rounds or a taser; it's slower than you, so kite it to the front-desk taser |
| Head Banger | −20 jumpscare if shooed away | Hand it a coffee — sip twice first and you net +10; or just let it break the glass |
| Camera Figure | −20 jumpscare if you zoom in | Switch feeds or close the camera; repairing broken cameras prevents it entirely |
| Bed Monster | −10 on the grab, then −5 per 2s | Step off the red floor first, then feed it Maple Syrup, an Organ or a Transplant |
| Stalker | −10 on eye contact | Cannot be killed — look at its legs, or watch it through the office window |
| Hiders | −10 only if you're empty-handed | Extinguisher, taser or gun; carrying any cheap item turns the hit into an item loss |
| Ghost | −2 per second nearby | Spray with the extinguisher to force it visible, then taser or shoot |
| Mass of Eyes | −2 to −5 per 0.5s while you look up | Don't look up — or hand it Eyedrops from the window ledge |
| Tendril | No sanity cost — it kills the patient | Scissors → Transplant → Scissors → Transplant, then 3 random steps. Never taser, gun or coffee |
Full write-ups for each of these — spawn conditions, timings, and the mistakes that make them worse — are on the main wiki's monster guide.
Planning a shift's sanity budget
61% is not much once you price the events out. Two jumpscares and one mis-fired taser come to −55 between them, which leaves 6% from the default start — one Stalker glance from dead. The practical version:
- Buy a chocolate bar early if you have $120 spare — +60 banked in three bites is more headroom than the coffee machine can give you inside a shift.
- Keep the coffee cycle running anyway. The machine brews a fresh cup every 180 seconds — that's +15on a timer, and a held cup doubles as the Head Banger's counter.
- Spend the taser only on confirmed anomalies. +2 versus −15 is a 17-point swing on a single decision — nothing else in the game moves the number that far for that little effort.
- Treat a dead patient as a compounding loss: a Ghost spawns after every patient death, and that's −2 per second for as long as it's near you.
FAQ
How does sanity work in Animal Hospital?
You start each shift at 61% by default (classes can raise it). Mistakes and monster encounters drain it, coffee and chocolate restore it, and hitting zero is how runs end. Every value in this tracker matches the game's verified numbers.
What restores sanity in Animal Hospital?
Coffee and chocolate are the standard restores, and some classes add their own recovery — Secretary regains sanity on check-ins, Doctor and Surgeon on heals. The tracker's buttons carry the exact values so you can plan a shift's sanity budget.
What drains sanity the fastest?
Taser hits on normal patients, ghost encounters, ritual candles and scare events are the big hitters — tap them in the tracker to see exactly how much margin you'd have left before the next coffee.
How much sanity does a coffee actually give?
+15 in total, delivered as +5 per sip across three sips. The machine brews one cup every 180 seconds, and once you've taken a cup you can't hand it to a teammate. A chocolate bar is the bigger restore at +60 for $120, taken as +20 per bite.
What happens when sanity hits zero?
You die. A teammate holding a $1,000 Teddy Bear can revive you, but you can never use one on yourself — which is why a solo run is really a race to keep the number above zero, not to get it back afterwards.